ASA 5500 Adding a DMZ Step By Step
| ||
| Problem | ||

Assumptions
1. Networks,
2. Interfaces,
3. The Web server in the DMZ will have the following IP addresses,
a. DMZ IP address 172.16.1.1
b. Public IP address 123.123.123.124 | ||
| Solution | ||
| 1. Firstly connect to the ASA log in and go to enable mode. | ||
User Access Verification
Password:
Type help or '?' for a list of available commands. PetesASA> en Password: ******** | ||
| 2. Go to configure terminal mode and set up the DMZ interface (In this case Ethernet0/2). | ||
PetesASA# conf t
PetesASA(config)# interface Ethernet0/2 PetesASA((config-if)# nameif DMZ PetesASA((config-if)# security-level 50 PetesASA((config-if)# ip address 172.16.1.254 255.255.0.0 PetesASA((config-if)# no shutdown PetesASA((config-if)# exit | ||
| 3. I like to name the DMZ entities IP addresses so things look neat. | ||
| PetesASA(config)# name 172.16.1.1 DMZ-Host-Private-IP PetesASA(config)# name 123.123.123.124 DMZ-Host-Public-IP | ||
| 4. Set a some NAT statement to handle traffic flow. (assuming you have a matching global statement like global (outside) 1 xxx - "show run global" will tell you). | ||
| PetesASA(config)# nat (DMZ) 1 0.0.0.0 0.0.0.0 | ||
Note We are only going to have one DMZ host, and it will have a static mapping - if you had many DMZ hosts then also add "global (DMZ) 1 interface".
| ||
| 5. Now add some static mappings. | ||
| PetesASA(config)# static (DMZ,outside) DMZ-Host-Public-IP DMZ-Host-Private-IP netmask 255.255.255.255 PetesASA(config)# static (inside,DMZ) 10.1.0.0 10.1.0.0 netmask 255.255.0.0 PetesASA(config)# static (inside,DMZ) 172.16.1.0 172.16.1.0 netmask 255.255.255.0 | ||
| 6. To let people from outside you need to either create an access-list or add some rules to any existing inbound access-list. ("show run access-group" will tell you, look for an ACLapplies "in" to the outside interface e.g. "access-group outbound in interface inside". We will assume I don't have one so i'll need the access-group at the end. | ||
PetesASA(config)# access-list inbound extended permit tcp any host DMZ-Host-Public-IP eq www
PetesASA(config)# access-list inbound extended permit tcp any host DMZ-Host-Public-IP eq https PetesASA(config)# access-group inbound in interface outside | ||
| 7. Now to allow the DMZ host to get to the database server I'm going to allow TCP 1433. | ||
| PetesASA(config)# access-list DMZ_outbound extended permit tcp host DMZ-Host-Private-IP host DMS-SQL eq 1433 PetesASA(config)# access-group DMZ_outbound in interface DMZ | ||
| 8. Finally save the configuration. |

VPN ALL
Monday, 14 May 2012
ASA 5500 Adding a DMZ Step By Step
Block Facebook & Google Talk on ASA
| Problem | ||||||||||||||||||||
| If you have an ASA5510 then this sort of thing would be better handled with a CSCModule, however on an ASA5505 thats not an option, and if you want to throw in a quick solution to stop your staff going to facebook during work time, then this is the best solution NOTE: This can be used for any web site simply add each URL you want to block. | ||||||||||||||||||||
| Solution | ||||||||||||||||||||
| ||||||||||||||||||||
Blocking Google Talk (Cisco ASA)
| ||
| Problem | ||
| You want to block access to Google Talk, but not disrupt other services like Google Search and Gmail. | ||
| Solution | ||
| Yes, you could write a REGEX and block it with an MPF, like I did here, to block Facebook. But Google Talk only runs on 4 servers and uses 4 ports. | ||
| 1. Connect to the Cisco ASA, and go to configure terminal mode. | ||
| PetesASA> PetesASA> en Password: ******** PetesASA# configure terminal PetesASA(config)# | ||
| 2. Lets keep things neat and name our four Goolge Talkservers. | ||
| PetesASA(config)# name 216.239.37.125 Google-Talk-Server-1 PetesASA(config)# name 72.14.253.125 Google-Talk-Server-2 PetesASA(config)# name 72.14.217.189 Google-Talk-Server-3 PetesASA(config)# name 209.85.137.125 Google-Talk-Server-4 | ||
| 3. Then lets create a group for those servers. | ||
| PetesASA(config)# object-group network Google-Talk-Servers PetesASA(config-network-object-group)# network-object host 216.239.37.125 PetesASA(config-network-object-group)# network-object host 72.14.253.125 PetesASA(config-network-object-group)# network-object host 72.14.217.189 PetesASA(config-network-object-group)# network-object host 209.85.137.125 | ||
| 4. And then a group for the ports we want to block. | ||
PetesASA(config-network-object-group)# object-group service Google-Talk-Ports tcp
PetesASA(config-service-object-group)# port-object eq 5222 PetesASA(config-service-object-group)# port-object eq 5223 PetesASA(config-service-object-group)# port-object eq https PetesASA(config-service-object-group)# port-object eq www | ||
| 5. To tie it all together we can simply add one ACL. | ||
| PetesASA(config-service-object-group)# access-list outbound line 1 deny tcp any object-group Google-Talk-Servers object-group Google-Talk-Ports | ||
| Note: This assumes you have an ACL called "outbound" thats applied to your outbound traffic, yours may have a different name, to find out issue a "show run access-group" command like so, your outbound ACL will be allied "in interface inside". If yours is called something different then change the command above accordingly. If you don't have one at all skip to step 6. | ||
| PetesASA(config)# show run access-group access-group outbound in interface inside access-group inbound in interface outside PetesASA(config)# | ||
| 6. Only carry this step out if you DO NOT have an ACL applied to outbound traffic. andAFTER you have carried out step 5. | ||
PetesASA(config)# access-group outbound in interface inside
PetesASA(config)# access-list outbound permit ip any any |
Deploy Cisco ASA 55xx in Active / Standby Failover
Deploy Cisco ASA 55xx in Active / Standby Failover
| |||||||||||||||||||||||||
| Problem | |||||||||||||||||||||||||
You want to deploy 2 Cisco ASA 55xx Series firewalls in an Active/Standby failover configuration.
| |||||||||||||||||||||||||
| Solution | |||||||||||||||||||||||||
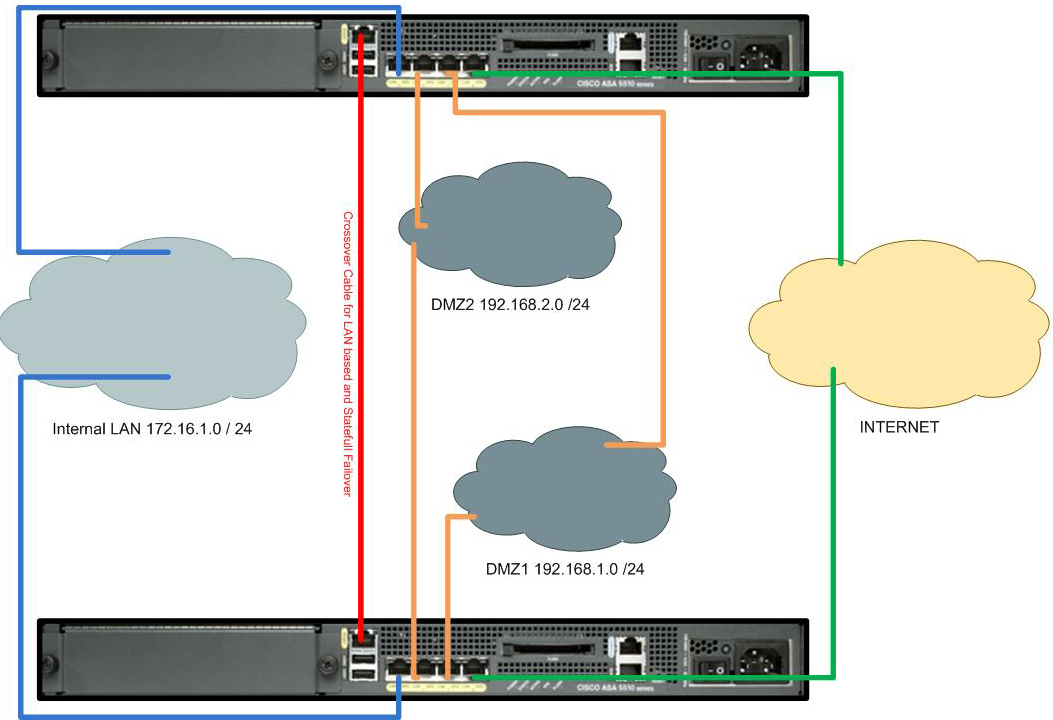
Assumptions.
Hardware on both ASA firewalls is identical.
In this example the firewalls were ASA5510's and all interfaces were being used, so the Management port was used as the "Failover Link" (That needs a security plus licence!).
This Link will use a crossover cable (Only available after version 7.0(2) before that you had to use a switch - I think!).
Also I'm using the same link for LAN Based failover (heartbeat) AND Statefull replication.
IP Addresses
Each interface will need its existing IP address, and an address to use whilst in "Standby". In this example I will use the following,
Outside Interface (Ethernet 0/0) 123.123.123.123 255.255.255.0
Outside Interface STANDBY 123.123.123.124 255.255.255.0 DMZ1 Interface (Ethernet0/1) 192.168.1.1 255.255.255.0 DMZ1 Interface STANDBY 192.168.1.254 255.255.255.0 DMZ2 Interface (Ethernet0/2) 192.168.2.1 255.255.255.0 DMZ2 Interface STANDBY 192.168.2.254 255.255.255.0 Inside Interface (Ethernet 0/3) 172.16.1.1 255.255.255.0 Inside Interface (STANDBY) 172.16.1.254 255.255.255.0 Failover Interface (Management0/0) 172.16.254.254 255.255.255.0 Failover Interface STANDBY 172.16.254.250 255.255.255.0
| |||||||||||||||||||||||||
Cannot Access / Open ASDM
Cannot Access / Open ASDM
| |||||||||||||||||||||||||
| Problem | |||||||||||||||||||||||||
| Out of the box Cisco PIX/ASA devices should have a working ASDM. This config can get broken over time, and also there are a few things that can trip you up on your client machine. | |||||||||||||||||||||||||
| Solution | |||||||||||||||||||||||||
Make sure the client machine you are using is not the problem
1. The ASDM runs using Java make sure the machine has Java installed.

2. Make sure the internet browser you are using is supported:
Note: ASDM requires an SSL connection from the browser to the ASA. By default, Firefox does not support base encryption (DES) for SSL and therefore requires the ASA to have a strong encryption (3DES/AES) license. As a workaround, you can enable the security.ssl3.dhe_dss_des_sha setting in Firefox. See http://kb.mozillazine.org/About:config to learn how to change hidden configuration preferences.
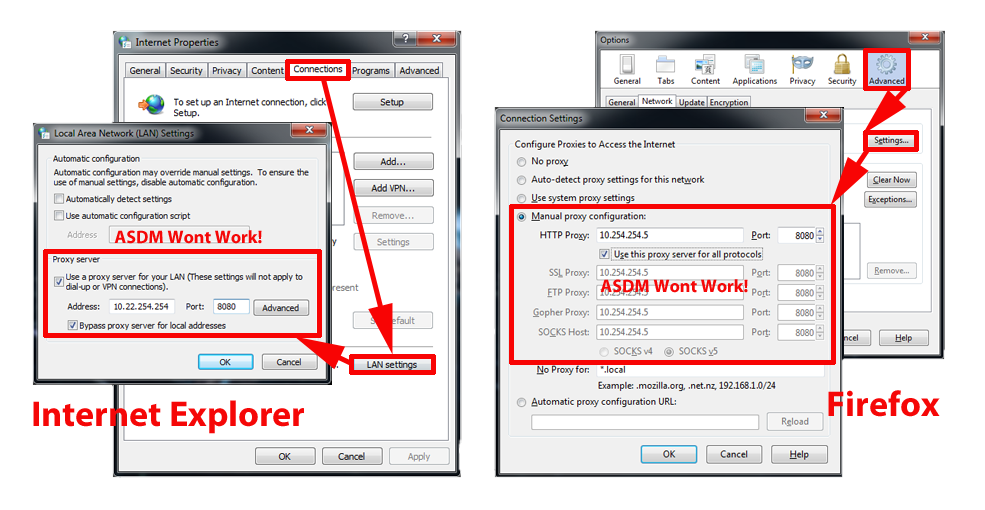
3. Make sure you are NOT trying to access the ASDM through a proxy server, this is a common "gotcha"!
4. Can another machine access the ASDM?
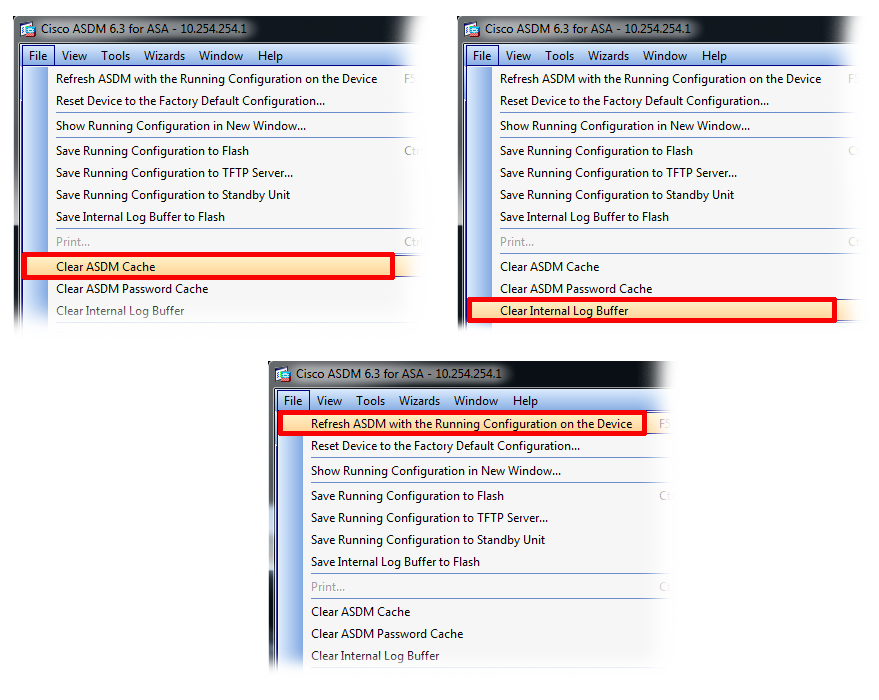
5. If the ASDM opens but does not display correctly, then do the following, File > Clear ASDM Cache > File > Clear Internal Log Buffer > File > Refresh ASDM with the running Configuration on the Device.
Make sure the ASA is configured correctly, and your PC is "allowed" access
2. Log into the firewall, go to enable mode > Enter the enable password.
| |||||||||||||||||||||||||
| Type help or '?' for a list of available commands. PetesASA> PetesASA> en Password: ******** PetesASA# | |||||||||||||||||||||||||
| 3. The ASDM is enabled with the command "http server enabled", to make sure that's there issue a "show run http" command" | |||||||||||||||||||||||||
| PetesASA# show run http http server enable http 10.254.254.0 255.255.255.0 inside http 123.123.123.123 255.255.255.255 outside | |||||||||||||||||||||||||
| Note: if the command is NOT there, you need to issue the following three commands: | |||||||||||||||||||||||||
PetesASA# configure terminal
9878 bytes copied in 1.550 secs (9878 bytes/sec)PetesASA(config)# http server enable PetesASA(config)# write mem Building configuration... Cryptochecksum: 9c4700fe 475d22c4 13442d06 b0317c69 [OK] PetesASA(config)# | |||||||||||||||||||||||||
| Note: If you see a number after the command e.g. "http server enable 2456" then you need to access the ASDM on that port, like so {IP address/Name of ASA}:2456 (This is common if you're port forwarding https but you still want to access the ASDM externally). | |||||||||||||||||||||||||
| 4. Assuming that the ASDM has been enabled, the IP address you are accessing from (or the subnet you are on) also needs to be allowed access. You will notice in step 3 above that when you issue the show run http command, it also shows you the addresses that are allowed access, if yours is NOT listed you can add it as follows: | |||||||||||||||||||||||||
| PetesASA# configure terminal PetesASA(config)# http 10.254.254.5 255.255.255.255 inside PetesASA(config)# http 10.254.254.0 255.255.255.0 inside PetesASA(config)# http 123.123.123.123 255.255.255.255 outside PetesASA(config)# write mem Building configuration... Cryptochecksum: 9c4700fe 475d22c4 13442d06 b0317c89
9878 bytes copied in 1.550 secs (9878 bytes/sec)
[OK] PetesASA(config)# | |||||||||||||||||||||||||
| 5. At this point try and access the ASDM again. | |||||||||||||||||||||||||
| 6. The ASA needs to be told what file to use for the ASDM, to make sure its been told issue the following command, (If there is NOT one specified then skip forward to step 7 to see if there is an ASDM image on the firewal)l. | |||||||||||||||||||||||||
| PetesASA# show run asdm asdm image disk0:/asdm-631.bin
Note: on a Cisco PIX the results will look like..
PetesPIX# show run asdmasdm image flash:/asdm-501.bin | |||||||||||||||||||||||||
| 7. Write down the file that it has been told to use (in the example above asdm-632.bin). Then make sure that file is actually in the firewalls memory with a "show flash" command. | |||||||||||||||||||||||||
| PetesASA# show flash --#-- --length-- -----date/time------ path 142 15943680 May 08 2010 18:10:42 asa831-k8.bin 144 14240396 May 08 2010 18:11:50 asdm-631.bin 3 2048 Jul 21 2009 12:04:26 log 6 2048 Apr 28 2010 15:08:32 crypto_archive 163 393828 Feb 14 2010 12:23:28 crypto_archive/crypto_arch_1.bin 164 393828 Apr 28 2010 15:08:32 crypto_archive/crypto_arch_2.bin 147 9526560 Jul 21 2009 12:04:52 csd_3.4.1108.pkg 148 2048 Jul 21 2009 12:04:54 sdesktop 150 2648712 Jul 21 2009 12:04:54 anyconnect-win-2.3.0254-k9.pkg 127135744 bytes total (29583360 bytes free) | |||||||||||||||||||||||||
| Note: If the file you are looking for is NOT there then (providing you have a valid support agreement with Cisco) download an ASDM image and load it into the firewall see here for instructions. Note: If the file is in the flash memory but was not referenced in step 6 then you can add the reference with the following command (obviously change the filename to match the one that's listed in your flash memory). | |||||||||||||||||||||||||
| PetesASA# configure terminal PetesASA(config)# asdm image disk0:/asdm-631.bin PetesASA(config)# write mem Building configuration... Cryptochecksum: 9c4700fe 475d22c4 13442d06 b0317c89
9878 bytes copied in 1.550 secs (9878 bytes/sec)
[OK] PetesASA(config)# | |||||||||||||||||||||||||
RDP to Multiple Servers with a Cisco PIX/ASA Firewall
RDP to Multiple Servers with a Cisco PIX/ASA Firewall
| ||
| Problem | ||
| You want to connect via "Remote Desktop" to multiple servers behind your firewall. To do this you have three options. | ||
| Solution | ||
| Option 1 (Use if you have multiple free Public IP addresses) Connect to the firewall, go to enable mode, then go to "Configure Terminal Mode", and create a names entity for each Servers public and Private Address | ||
Petes-ASA> en
Password: ********* Petes-ASA# Petes-ASA#configure terminal Petes-ASA(config)# Petes-ASA(config)# name 192.168.1.1 Server1-Internal Petes-ASA(config)# name 192.168.1.2 Server2-Internal Petes-ASA(config)# name 123.123.123.123 Server1-External Petes-ASA(config)# name 123.123.123.124 Server2-External | ||
| Now Allow RDP to both of the servers with an Access con troll list and apply that access con troll list to the outside interface (Note if you already have in inbound ACL simply substitute the name "inbound" for yours. | ||
Petes-ASA(config)# access-list inbound extended permit tcp any host Server1-External eq 3389
Petes-ASA(config)# access-list inbound extended permit tcp any host Server2-External eq 3389 Petes-ASA(config)# access-group inbound in interface outside | ||
| Option 2 (Uses Port Forwarding and uses a different port for each server). To deploy this option the ASA will accept the connection for each server on a different port, to do this each server must listen on a different port. Connect to the firewall, go to enable mode, then go to "Configure Terminal Mode" then allow each port you are going to use (in this case 3389 and 3390) | ||
Petes-ASA> en
Password: ********* Petes-ASA# Petes-ASA#configure terminal Petes-ASA(config)# Petes-ASA(config)# access-list inbound extended permit tcp any interface outside eq 3389 Petes-ASA(config)# access-list inbound extended permit tcp any interface outside eq 3390 | ||
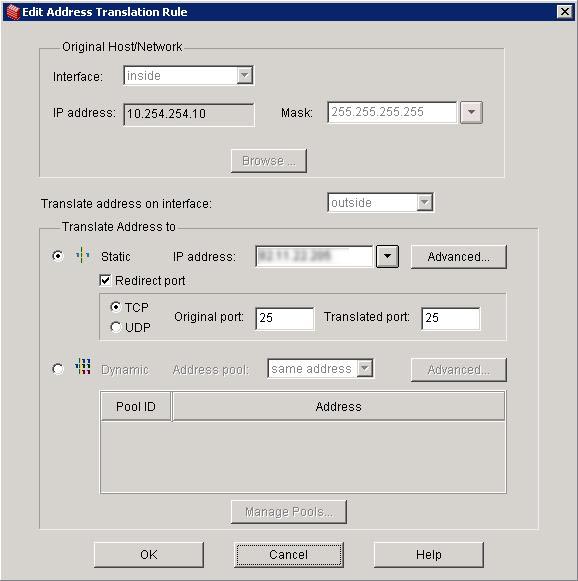
| Then Port Forward those ports to the correct internal servers. | ||
| Petes-ASA(config)# static (inside,outside) tcp interface 3389 192.168.1.1 3389 netmask 255.255.255.255 Petes-ASA(config)# static (inside,outside) tcp interface 3390 192.168.1.2 3390 netmask 255.255.255.255 | ||
| Option 3 (Uses Port Forwarding and uses a different port for each server). This differs from option 2 because in this example the firewall will translate each incoming port to RDP 3389 and sent it to the correct Server. | ||
| Petes-ASA> en Password: ********* Petes-ASA# Petes-ASA#configure terminal Petes-ASA(config)# Petes-ASA(config)# access-list inbound extended permit tcp any interface outside eq 3389 Petes-ASA(config)# access-list inbound extended permit tcp any interface outside eq 3390 | ||
| Then Port Forward AND TRANSLATE those ports to the correct internal servers. | ||
| Petes-ASA(config)# static (inside,outside) tcp interface 3389 192.168.1.1 3389 netmask 255.255.255.255 Petes-ASA(config)# static (inside,outside) tcp interface 3390 192.168.1.2 3389 netmask 255.255.255.255 |
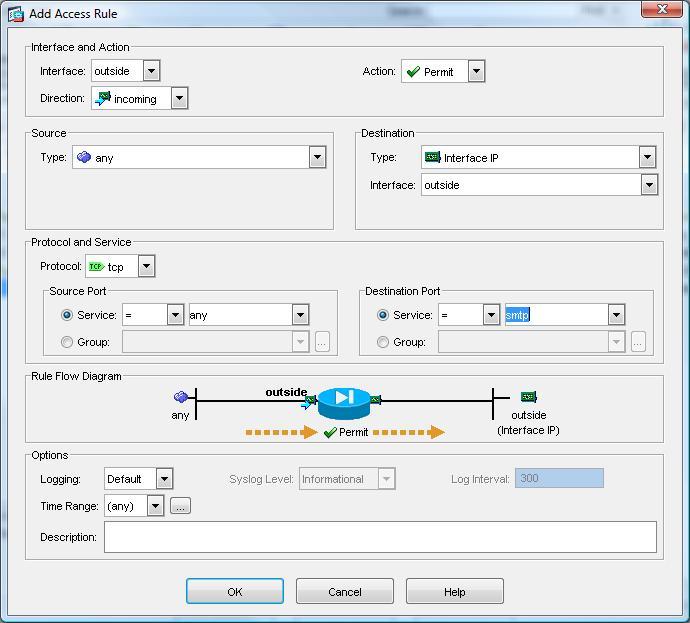
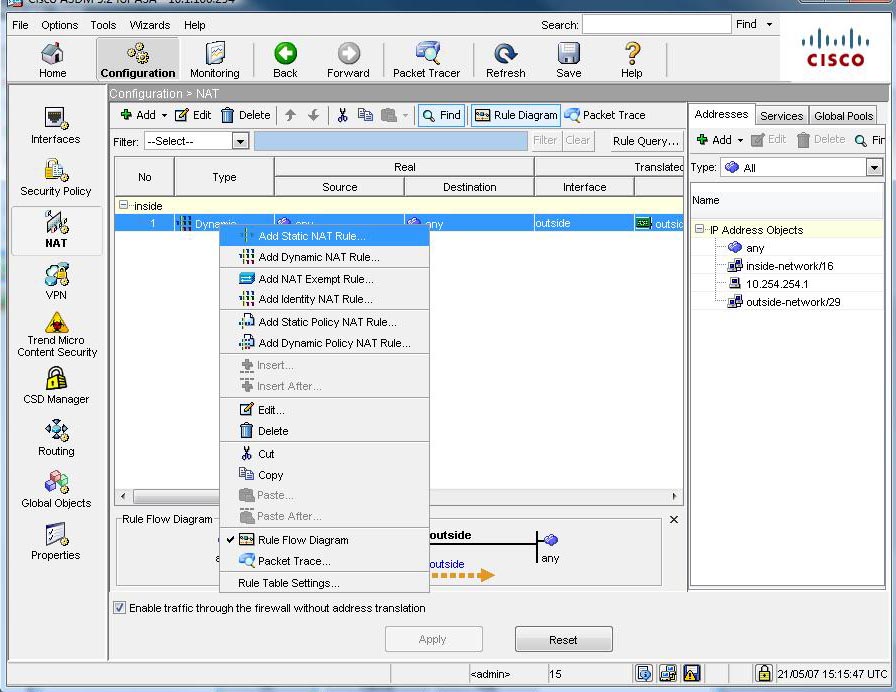
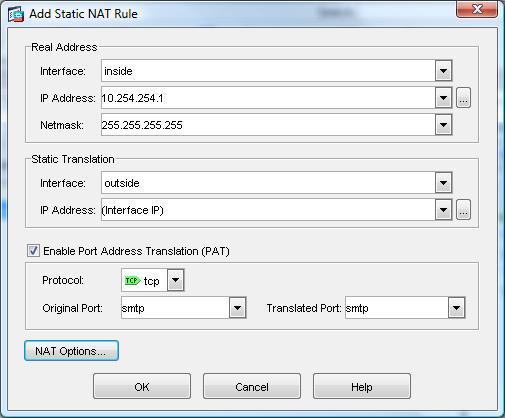
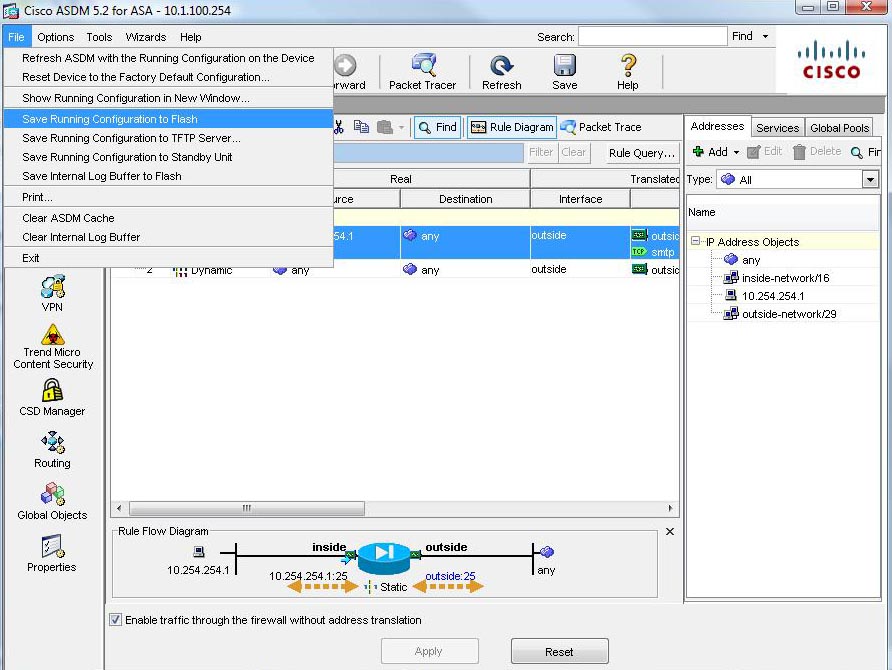
Cisco PIX / ASA Port Forwarding
Problem | ||||||||||||||||||||||||||||||||||||||||||||||||||||||||||||||||||||||||||||||||||
Note: Port forwarding has changed on PIX/ASA devices running OS 8.3 for the new syntax go here.Cisco PIX/ASA Port forwarding (Pre Version 8.3)Port forwarding on Cisco firewall's can be a little difficult to get your head around, to better understand what is going on remember in the "World of Cisco" you need to remember two things.....1. NAT Means translate Many addresses to FEW Addresses 2. PAT Means translate many addresses to ONE Address. Why is that important you ask? Well most networking types assume NAT is translating one address to many,BUT on a Cisco device this is PAT, and it uses (as the name implies) port numbers to track everything. e.g. the first connection out might be seen on the firewall as 123.123.123.123:1026 and the second connection outbound might be seen as 123.123.123.123:2049 so when the traffic comes back the firewall knows where to send it. Fair enough but what has that got to do with Port Forwarding? Well you can use the exact same system to lock a port to an IP address - so if only one port can go to one IP address then that's going to give you port forwarding :) To make matters more confusing (sorry) you configure PAT in the NAT settings, for this very reason it confuses the hell out of a lot of people and the GUI is not intuitive for configuring Port forwarding (the ADSM is better than the old PDM) but most people prefer to use command line to do port forwarding. Below you will find Option 1 Use Command Line Interface Option 2 Use ASDM (PIX v7 and ASA Only) Option 3 Use PDM (PIX v6 Only) | ||||||||||||||||||||||||||||||||||||||||||||||||||||||||||||||||||||||||||||||||||
| Solution | ||||||||||||||||||||||||||||||||||||||||||||||||||||||||||||||||||||||||||||||||||
| ||||||||||||||||||||||||||||||||||||||||||||||||||||||||||||||||||||||||||||||||||


Backup and Restore a Cisco Firewall
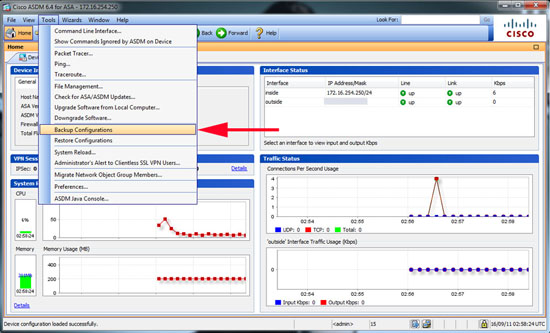
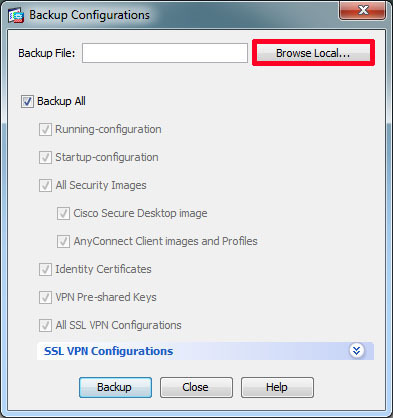
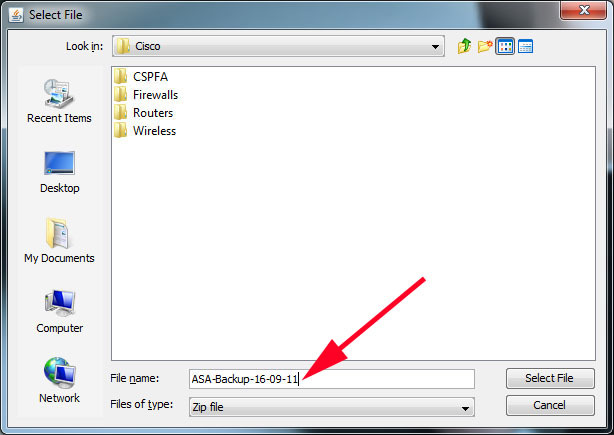
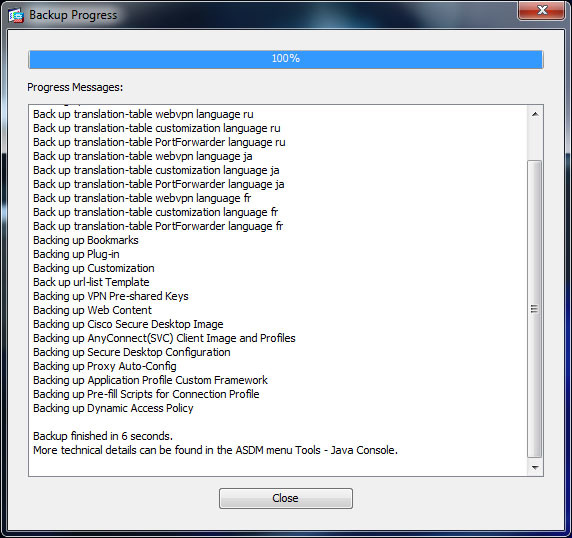
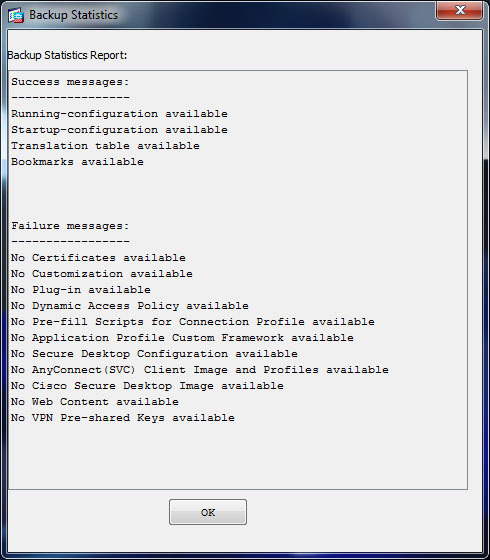
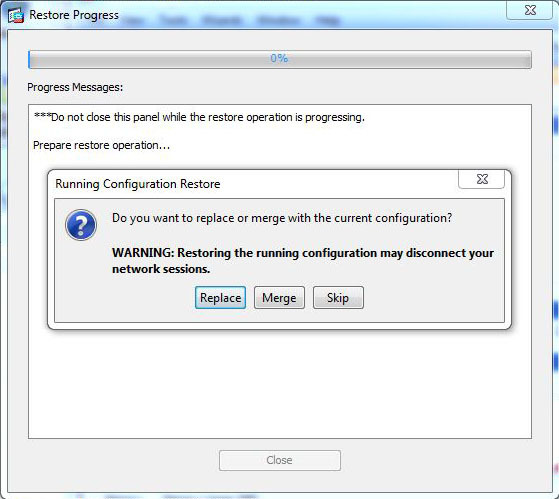
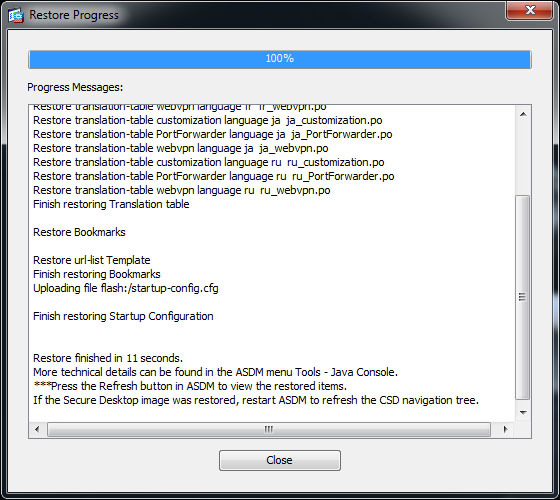
Backup and Restore a Cisco Firewall. | ||||||||||||||||||||||||||||||||
Problem | ||||||||||||||||||||||||||||||||
There are many different versions of PIX and ASA Firewall's, if you want to get a backup of the configuration and save it elsewhere - so in the event of a failure, (or more likely someone tinkering and breaking the firewall). you will be able to recall and restore that configuration. By far the easiest is to use a TFTP server - and it works on ALL versions, so learn it once and use it many times.
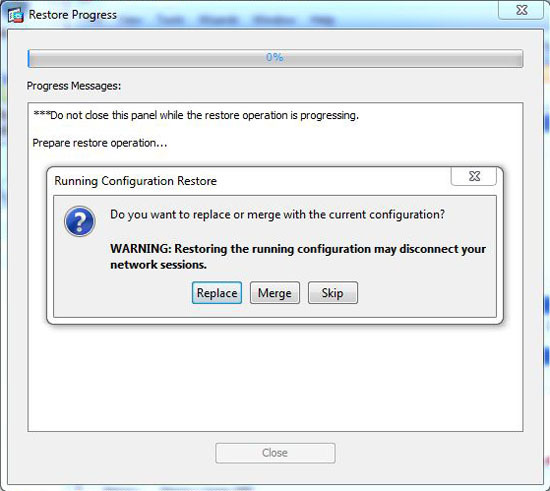
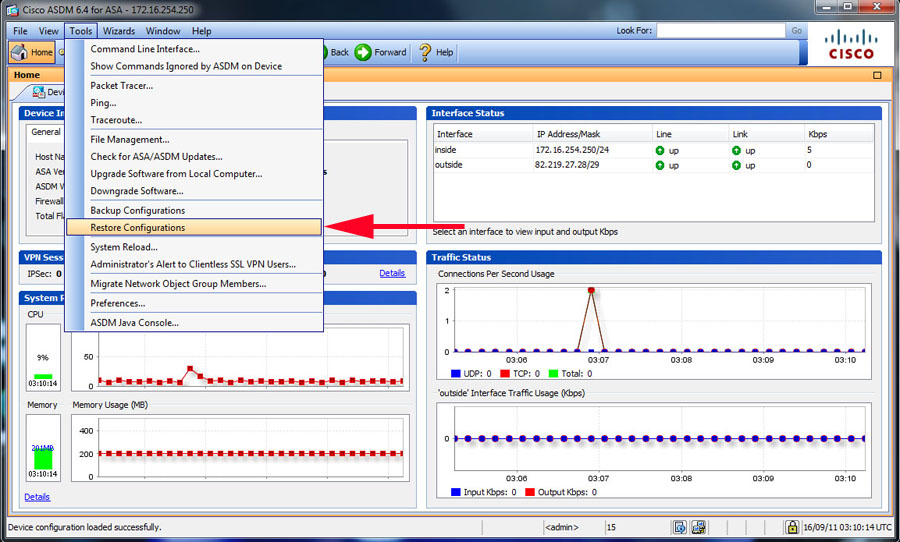
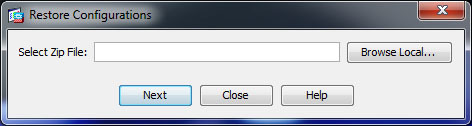
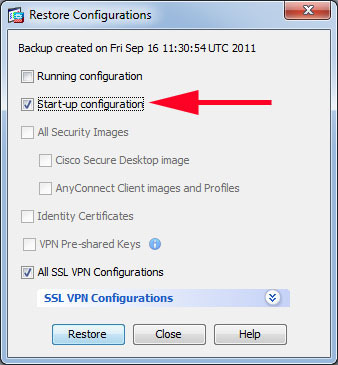
Note: Some people flatly refuse to use command line, if that's you, you can also backup and restore from the ASDM click here.
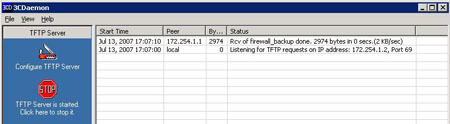
OK for starters you need to get a TFTP server - while this sounds very grand, its a little piece of software that will run on just about any windows PC, I use an application called 3CDeamon and I've put information on how to get it and how to set it up (about 5 min's work) HERE.
So I'll assume you have the TFTP server installed and running and you know what IP address the machine that's running it, is using.
| ||||||||||||||||||||||||||||||||
Solution | ||||||||||||||||||||||||||||||||
| ||||||||||||||||||||||||||||||||


ICMP PING CMD IN FIREWALL & ASDM
Cisco Firewalls and PING(Note: Tracert uses Ping protocols and the firewall treats ping and tracert the same)
| ||
| Problem | ||
| With regards to Ping, out of the box a Cisco firewall will allow you to ping the interface you are connected to, so in a normal setup inside clients can ping the inside interface, and the firewalls outside interface can be pinged from outside. OK – to understand pinging through a Cisco Firewall you need to understand that Ping is part of the ICMP protocol suite, and unlike other protocols is not “connection orientated” what that means is, (on a new firewall that has no rules applied outbound) the firewall happily lets ping traffic out but it won’t let ping traffic back in – this results in a failure on the client. | ||
| Solution | ||
Cisco ASA and Cisco PIX (version 7 and above) From CLI
Version 7 introduced an ICMP inspection engine so that it could track ICMP requests like other protocols. It’s NOT turned on by default. And the command is “inspect icmp” but you need to enter the default map first (this assumes you have the standard policy-map).Connect to the firewall and use the following commands from config terminal mode. then save the changes with a "write mem" command.
| ||
| PetesASA> PetesASA> en Password: ******** PetesASA# conf t PetesASA(config)# policy-map global_policy PetesASA(config)# (config-pmap)# class inspection_default PetesASA(config)# inspect icmp PetesASA(config)# write mem Building configuration... Cryptochecksum: 5c8dfc45 ee6496db 8731d2d5 fa945425
8695 bytes copied in 3.670 secs (2898 bytes/sec)
[OK] PetesASA(config)# | ||
| Cisco ASA and Cisco PIX (version 7 and above) From ASDM Connect to the ASDM > Configuration > Firewall > Service Policy Rules > Select "inspection_default" > Edit > Rule Actions > Tick ICMP > OK > Apply > File > Save running configuration to flash. 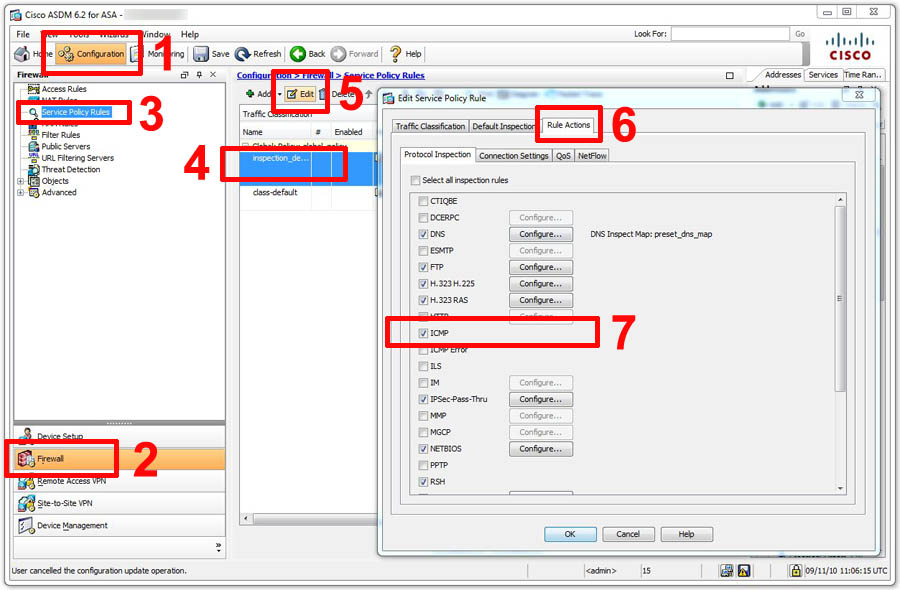 | ||
| Older firewall do not have an inspection map, nor was there a "fixup" for ICMP and ping traffic, so you need to explicitly allow the return icmp traffic back in. Note: this assumes you already have an inbound access-list called "inbound", and we are adding some more lines to it, change the works inbound to match the name/number of your inbound access list (the "show access-group" will tell you what is applied to the outside interface) e.g. | ||
| PetesASA> PetesASA> en Password: ******** PetesASA# show access-groupaccess-group inbound in interface outside <<This ones called inbound. | ||
| If you already have an access-list applied then simply substitute the name word "inbound" for the name on your ACL. | ||
| PetesASA# conf t PetesASA(config)# access-list inbound permit icmp any any echo-reply PetesASA(config)# access-list inbound permit icmp any any time-exceeded PetesASA(config)# access-list inbound permit icmp any any unreachable PetesASA(config)# access-list inbound permit icmp any any source-quench | ||
| If you HAD an inbound ACL skip this step, If you didn't have one you need to apply the ACL with an access-group command. | ||
| PetesASA(config)# access-group inbound in interface outside | ||
| Lastly save your work with a write mem command. | ||
| PetesASA# write mem Building configuration... Cryptochecksum: 4d7f7ccd 5c55a9e1 6ced12c4 46728bc7 [OK] PetesASA# | ||
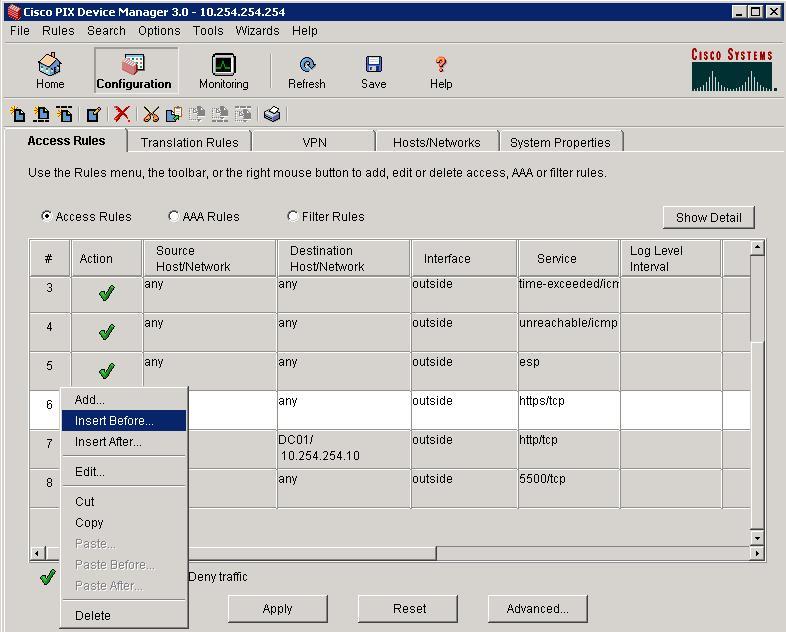
|
Connect to the PDM > Configuration > Access Rules > Rules > Add > Permit > Outside Inside > Tick ICMP > Select "echo-reply"> OK > Apply > File > Save running configuration to flash.
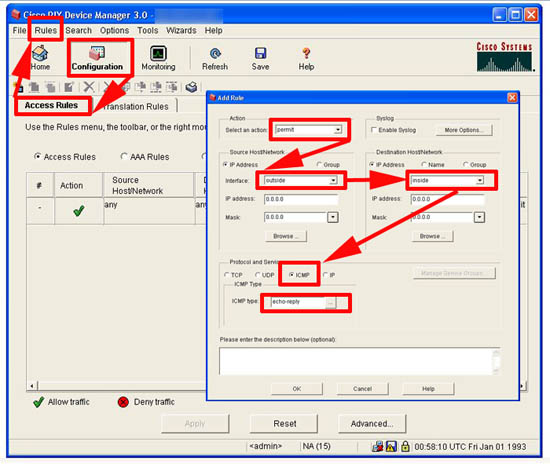
Then repeat for time-exceeded, unreachable and source-quench
| ||
| Stop Interfaces replying to Ping traffic As stated above all firewall interfaces will respond to pings if they are on the network you are connected to. To stop this you use the "icmp" command. Do the same from ASDM Connect to the ASDM > Configuration > Device Management > Management Access > ICMP > Add > Select ICMP type > Interface > Action > OK > Apply > File > Save running configuration to flash. 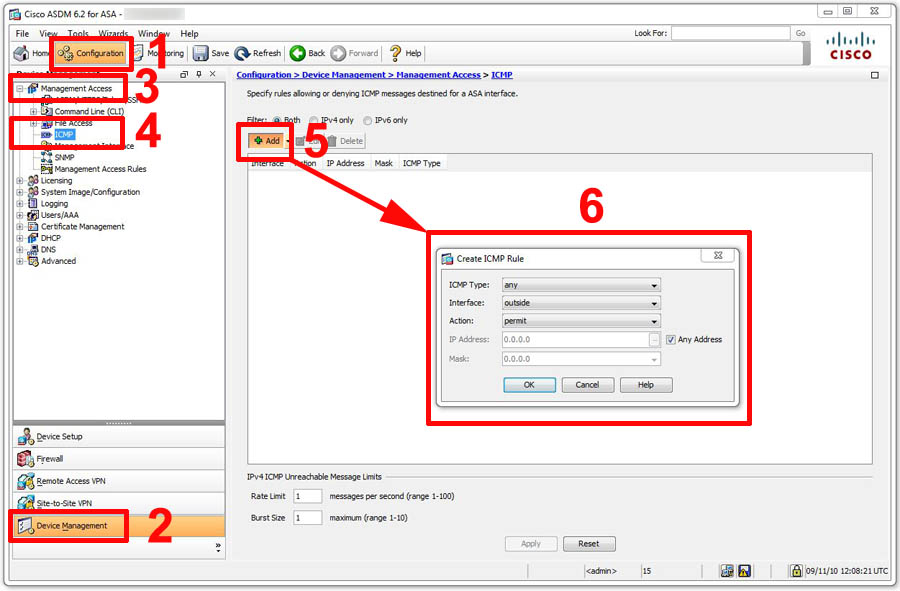
Do the same from PDM
Connect to the PDM > Configuration > system Properties > Administration > ICMP > Add > > Specify the Type, Interface, Source etc > OK > Apply > File > Save running configuration to flash.
 |
Subscribe to:
Posts (Atom)