| |
Option 1 Use the Command Line to Port Forward (pre version 8.3)
1 Port to 1 IP Address
|
| |
Warning Notice
User Access Verification
Password:
Type help or '?' for a list of available commands.
firewall>
| 1. First things first, you will need to know what port you want to forward, and where you want to forward it, for this example We will assume I've got a server at 10.254.254.1 and Its a mail server so I want to Forward all TCP Port 25 traffic to it. connect to the Firewall via Console/Telnet or SSH |
firewall> enable
Password: ********
firewall# | 2. Enter enable mode, and enter the enable mode password. |
firewall# configure terminal
firewall(config)# | 3. Now we need to go to configuration mode. |
firewall(config)#access-list inbound permit tcp any interface outside eq smtp
firewall(config)#
| 4. Before we can configure port forwarding we need to allow the traffic (this is a firewall after all), to allow traffic you need an access list. |
firewall(config)#access-group inbound in interface outside
firewall(config)# | 5. Remember access-lists WONT work if you don't apply them to an interface, so we apply this one to the outside interface with an access-group command |
firewall(config)#static (inside,outside) tcp interface smtp 10.254.254.1 smtp netmask 255.255.255.255
firewall(config)#
| 6. Lastly the command that actually does the port forwarding. (static command) |
firewall(config)# write memory
Building configuration...
Cryptochecksum: aab5e5a2 c707770d f7350728 d9ac34de
[OK]
firewall(config)# | 7. Don't forget to save your hard work. (write memory) |
| |
Option 2 Use the ASDM (PIX V7 and ASA5500)
1 Port to 1 IP Address
|
| |
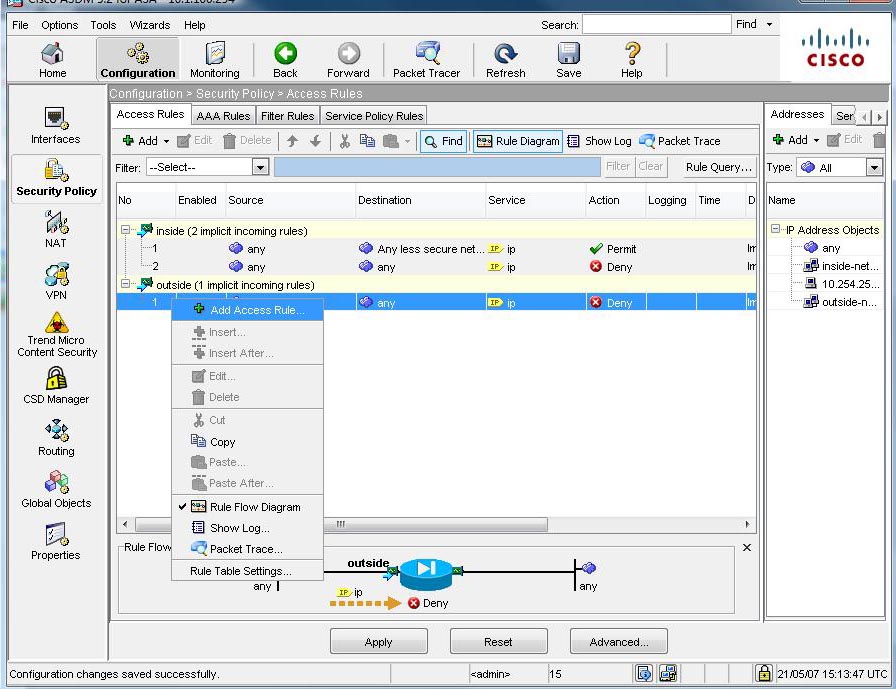
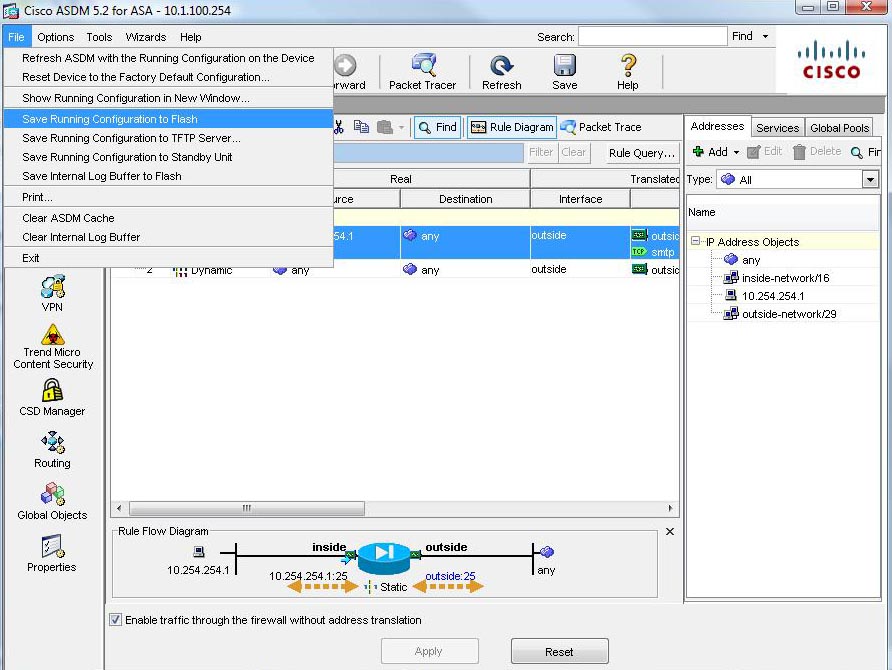
 | 1. As above you will need to know the port and the IP to forward it to, Launch the ASDM, Select Configuration > Security Policy > Then either Rule Add, or right click the incoming rules and select "Add Access Rule" |
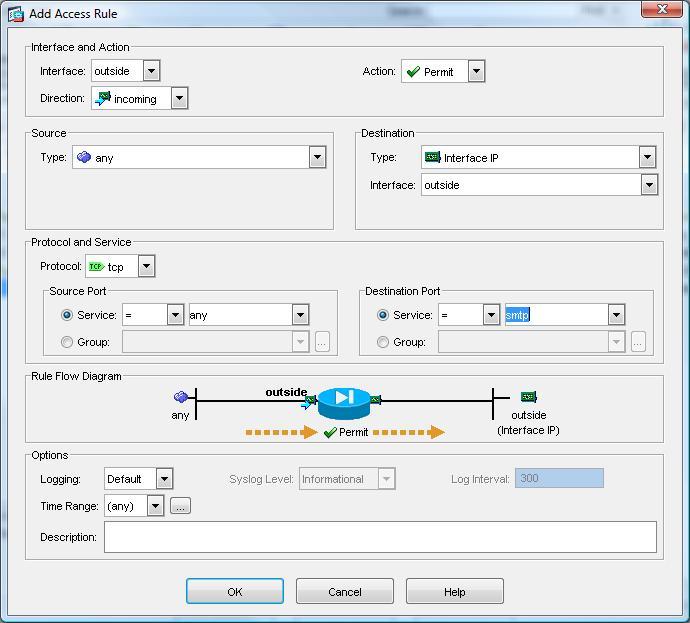
 | 2. Interface = Outside > Direction = Incoming > Action = Permit > Source = Any > Destination, Type = Interface IP, Interface = Outside > Protocol = TCP > Destination Port Source = smtp > OK > Apply. |
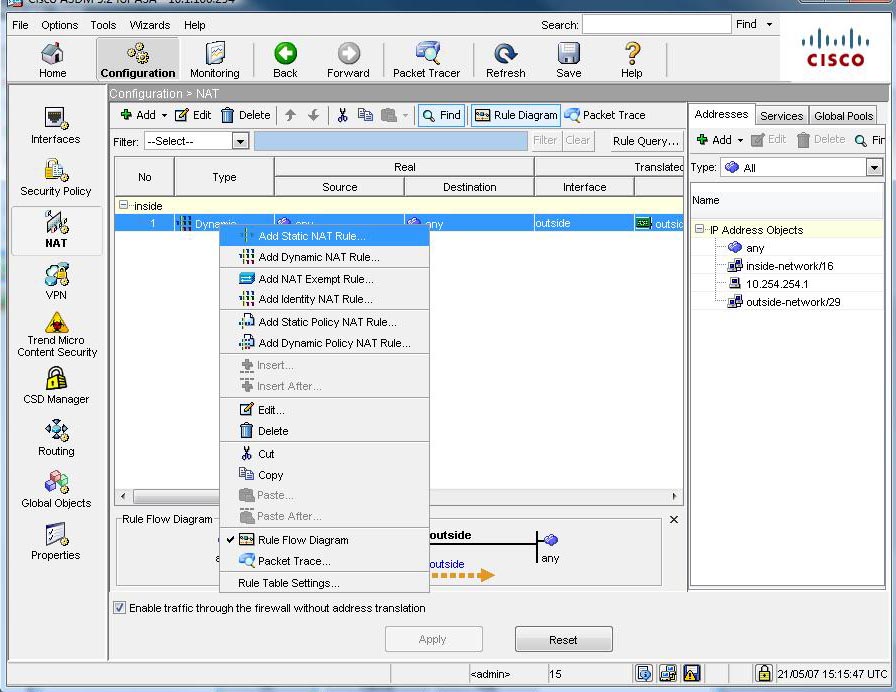
 | 3. Back at the main screen select Configuration > NAT > Add, or Right Click an Existing mapping and click "Add Static NAT Rule" |
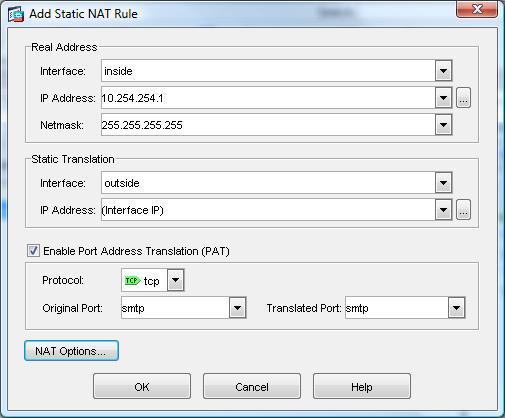
 | 4. Real Address Interface = Inside > IP Address = 10.254.254.1 > Netmask = 255.255.255.255 > Static Translation Interface = outside > IP Address = (Interface IP) > Tick "Enable Port Translation (PAT) > Protocol = TCP > Original Port = smtp > Translated Port =smtp > OK > Apply. |
 | 5. File > "Save Running Configuration to Flash." |
| . |
Option 3 Use the PIX Device Manager (PIX Version 6 Only)
1 Port to 1 IP Address
|
| |
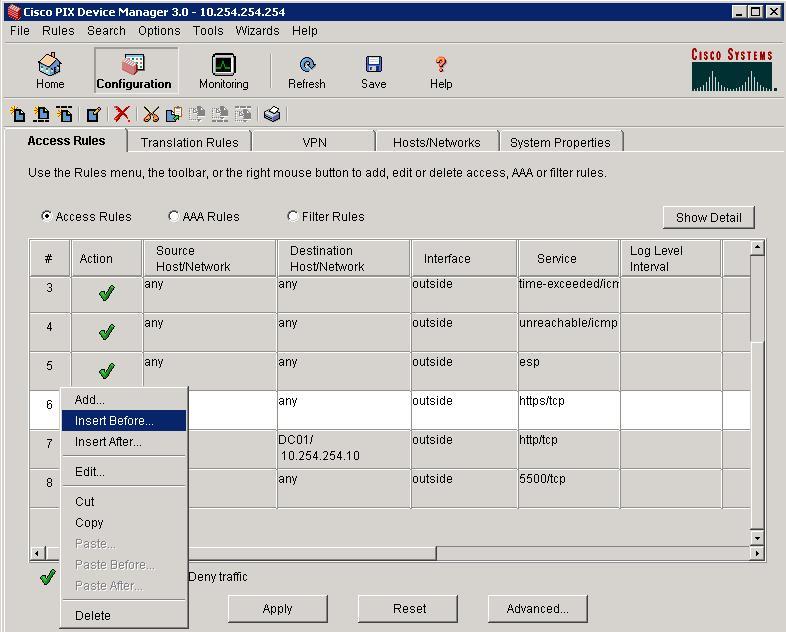
 | 1. As above you will need to know the port and the IP to forward it to, Launch the PIX Device manager, Select Configuration > Access Rules > Then either click "Rule"s > Add or Right click an incoming rule and select > "Insert Before" or "Insert After". |
 | 2. Under the "Action" select "Permit", Under Source Host/Network Select "Outside", and all the zeros, Under Destination Host/Network Select "Inside" and all the zeros then set the "Destination Port" to smtp > OK > Apply. |
 | 3, Now select the "Translation Rules" tab, Rules Add or Right click a rule and select "Insert before" or "Insert After". |
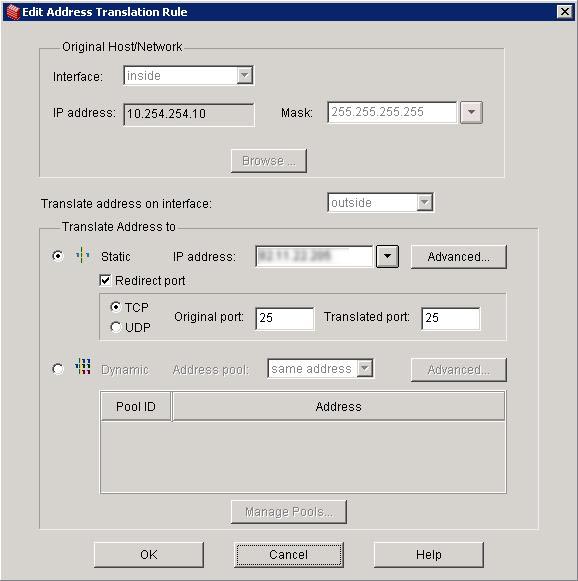
 | 4. In this example I've set it to forward all TCP Port 25 traffic to 10.254.254.10 (NOTE: I've blurred out the public IP Address you will need to add this also. > OK > Apply. |
 | 5. Finally save your work > File > "Save Running Configuration to Flash." > Exit. |
| |
Cisco PIX/ASA Port forwarding (Post Version 8.3)
|
| |
| Note: Port forwarding has changed on PIX/ASA devices running OS 8.3 and above,in regards to port forwarding. There is no longer a global command, for a full rundown of the changes click here. |
If you issue a global command after version 8.3 you will see this error,
ERROR: This syntax of nat command has been deprecated.
Please refer to "help nat" command for more details. |
From Command Line
|
Warning Notice
User Access Verification
Password:
Type help or '?' for a list of available commands.
PetesASA>
| 1. First things first, you will need to know what port you want to forward, and where you want to forward it, for this example We will assume I've got a server at 10.254.254.5 and Its a mail server so I want to Forward all TCP Port 80 traffic (HTTP) to it. connect to the Firewall via Console/Telnet or SSH |
PetesASA> enable
Password: ********
PetesASA# | 2. Enter enable mode, and enter the enable mode password. |
PetesASA# configure terminal
PetesASA(config)# | 3. Now we need to go to configuration mode. |
PetesASA# configure terminal
PetesASA(config)# object network Internal_Web_Server
PetesASA(config-network-object)# host 10.254.254.5
| 4. Create an object for the web server that the traffic is going to be forwarded to. |
PetesASA(config-network-object)# nat (inside,outside) static interface service tcp http http
PetesASA(config-network-object)# exit | 5. Then create a NAT translation for the port to be forwarded. then you can exit the network object prompt. |
PetesASA(config)# access-list inbound permit tcp any object Internal_Web_Server eq http
| 6. Now you need to allow the http traffic in |
PetesASA(config)# access-group inbound in interface outside
PetesASA(config)# | 7. Remember access-lists WONT work if you don't apply them to an interface, so we apply this one to the outside interface with an access-group command |
PetesASA(config)# write memory
Building configuration...
Cryptochecksum: aab5e5a2 c707770d f7350728 d9ac34de
[OK]
PetesASA(config)# | 8. Don't forget to save your hard work. (write memory) |


No comments:
Post a Comment